
Host on AWS Amplify
Host your project on AWS Amplify.
Use these instructions to enable continuous deployment from a GitHub repository. The same general steps apply for other Git providers such as GitLab or Bitbucket.
Do not commit the contents of the publishDir directory to your repository. Hugo recreates this directory when you build your project.
Prerequisites
Please complete the following tasks before continuing:
- Create an AWS account.
- Log in to your AWS account.
- Create a GitHub account.
- Log in to your GitHub account.
- Create a GitHub repository for your project.
- Create a local Git repository for your project with a remote reference to your GitHub repository.
- Create a Hugo project within your local Git repository and test it with the
hugo servercommand. - Commit the changes to your local Git repository and push to your GitHub repository.
Procedure
- Step 1
- Create an
amplify.ymlfile in the root of your project, adjusting the tool versions and time zone as needed.amplify.ymlversion: 1 env: variables: # Define tool versions DART_SASS_VERSION: 1.101.0 GO_VERSION: 1.26.4 HUGO_VERSION: 0.164.0 NODE_VERSION: 24.18.0 # Set the build time zone TZ: Europe/Oslo # Set the build cache directory HUGO_CACHEDIR: ${PWD}/.cache/hugo frontend: phases: preBuild: commands: # Create a temporary directory for downloads - build_temp_dir=$(mktemp -d) # Create a local tools directory - mkdir -p "${HOME}/.local" # Install Dart Sass - | echo "Installing Dart Sass ${DART_SASS_VERSION}..." curl -sfL --output-dir "${build_temp_dir}" -O "https://github.com/sass/dart-sass/releases/download/${DART_SASS_VERSION}/dart-sass-${DART_SASS_VERSION}-linux-x64.tar.gz" tar -C "${HOME}/.local" -xf "${build_temp_dir}/dart-sass-${DART_SASS_VERSION}-linux-x64.tar.gz" export PATH="${HOME}/.local/dart-sass:${PATH}" # Install Go - | if [[ -f "go.mod" ]]; then echo "Installing Go ${GO_VERSION}..." curl -sfL --output-dir "${build_temp_dir}" -O "https://go.dev/dl/go${GO_VERSION}.linux-amd64.tar.gz" tar -C "${HOME}/.local" -xf "${build_temp_dir}/go${GO_VERSION}.linux-amd64.tar.gz" export PATH="${HOME}/.local/go/bin:${PATH}" fi # Install Hugo - | echo "Installing Hugo ${HUGO_VERSION}..." curl -sfL --output-dir "${build_temp_dir}" -O "https://github.com/gohugoio/hugo/releases/download/v${HUGO_VERSION}/hugo_${HUGO_VERSION}_linux-amd64.tar.gz" mkdir -p "${HOME}/.local/hugo" tar -C "${HOME}/.local/hugo" -xf "${build_temp_dir}/hugo_${HUGO_VERSION}_linux-amd64.tar.gz" export PATH="${HOME}/.local/hugo:${PATH}" # Install Node.js - | if [[ -f "package-lock.json" ]]; then echo "Installing Node.js ${NODE_VERSION}..." curl -sfL --output-dir "${build_temp_dir}" -O "https://nodejs.org/dist/v${NODE_VERSION}/node-v${NODE_VERSION}-linux-x64.tar.gz" tar -C "${HOME}/.local" -xf "${build_temp_dir}/node-v${NODE_VERSION}-linux-x64.tar.gz" export PATH="${HOME}/.local/node-v${NODE_VERSION}-linux-x64/bin:${PATH}" fi # Log tool versions - | echo "Logging tool versions..." command -v sass &> /dev/null && echo "Dart Sass: $(sass --version)" || echo "Dart Sass: not installed" command -v go &> /dev/null && echo "Go: $(go version)" || echo "Go: not installed" command -v hugo &> /dev/null && echo "Hugo: $(hugo version)" || echo "Hugo: not installed" command -v node &> /dev/null && echo "Node.js: $(node --version)" || echo "Node.js: not installed" # Configure Git - | echo "Configuring Git..." git config --global core.quotepath false # Fetch full Git history - | if [[ $(git rev-parse --is-shallow-repository) == true ]]; then echo "Fetching full Git history..." git fetch --unshallow fi # Initialize Git submodules - | if [[ -f .gitmodules ]]; then echo "Initializing Git submodules..." git submodule update --init --recursive fi # Install Node.js dependencies - | if [[ -f package-lock.json ]]; then echo "Installing Node.js dependencies..." npm ci fi build: commands: # Build the project - | echo "Building the project..." hugo build --gc --minify artifacts: baseDirectory: public files: - '**/*' cache: paths: - .cache/hugo/**/* - Step 2
- In your project configuration, change the location of the image cache to the
cacheDiras shown below:caches: images: dir: :cacheDir/images[caches] [caches.images] dir = ':cacheDir/images'{ "caches": { "images": { "dir": ":cacheDir/images" } } }See configure file caches for more information.
- Step 3
- Commit and push the change to your GitHub repository.
git add -A git commit -m "Create amplify.yml" git push - Step 4
- Log in to your AWS account, navigate to the Amplify Console, then press the Deploy an app button.
- Step 5
- Choose a source code provider, then press the Next button.
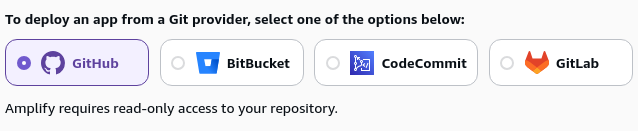
- Step 6
- Authorize AWS Amplify to access your GitHub account.
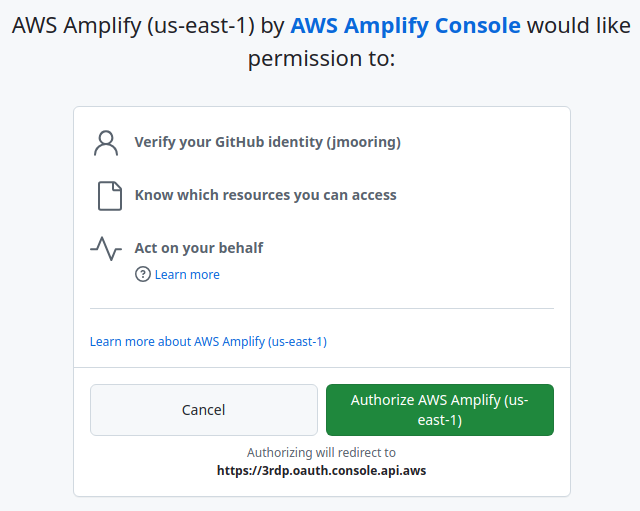
- Step 7
- Select your personal account or relevant organization.
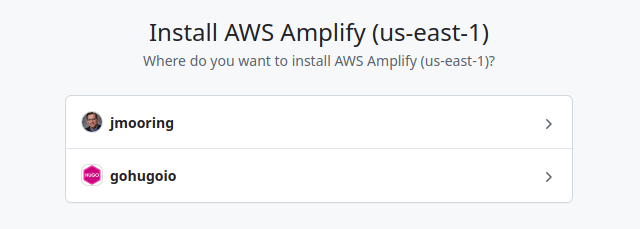
- Step 8
- Authorize access to one or more repositories.
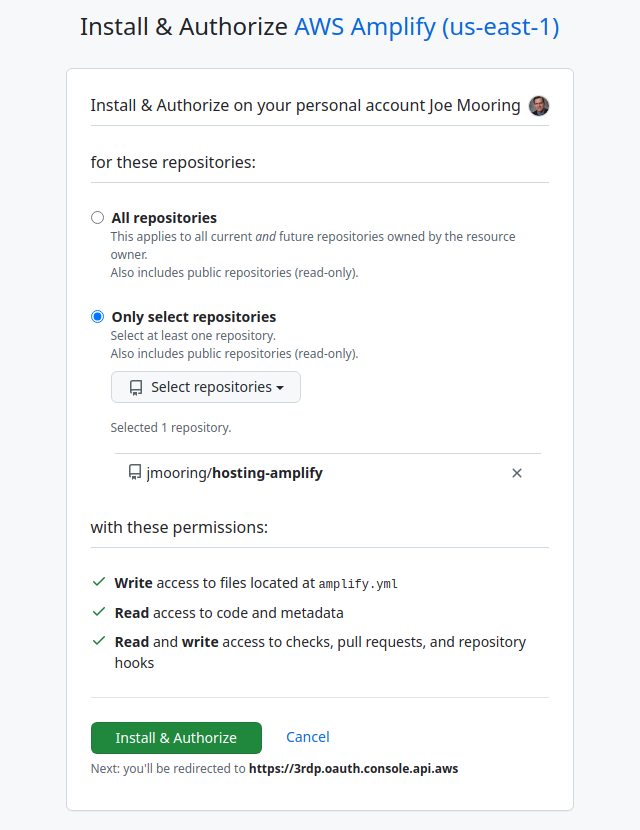
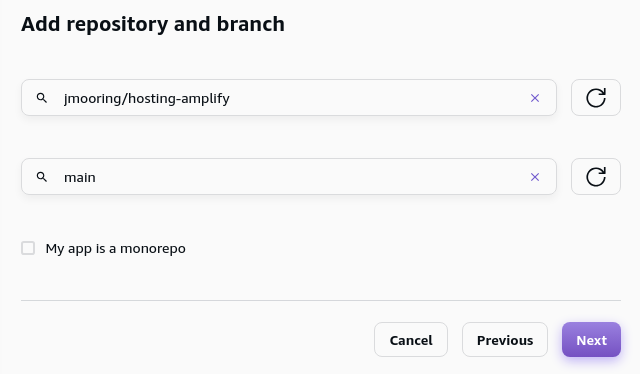
- Step 9
- Select a repository and branch, then press the Next button.
- Step 10
- On the “App settings” page, scroll to the bottom then press the Next button. Amplify reads the
amplify.ymlfile you created in Steps 1-3 instead of using the values on this page. - Step 11
- On the “Review” page, scroll to the bottom then press the Save and deploy button.
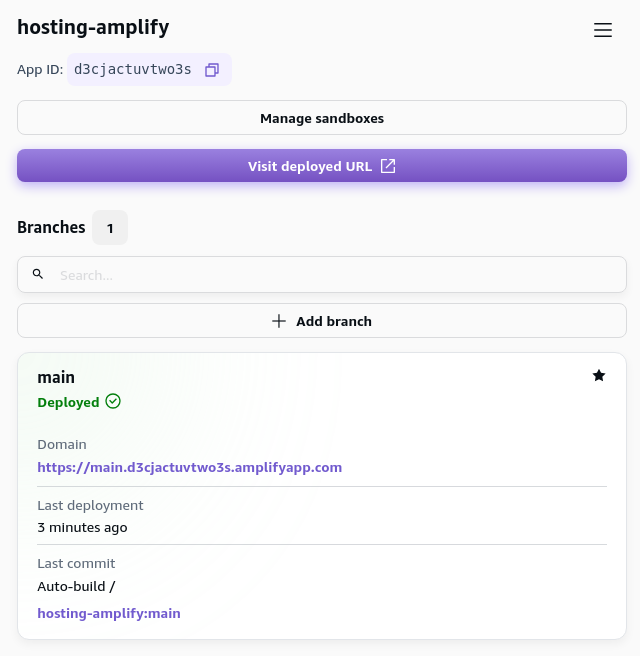
- Step 12
- When your site has finished deploying, press the Visit deployed URL button to view your published site.
Last updated:
July 10, 2026
:
content: Update Amplify, Codeberg, and GitHub workflows (59f85b7d1)
Improve this page